Wednesday, January 21, 2009

Top down snail beanie, BABY WORSTED ROUGH RECIPE


This is the first in a series of top down spiral hats.

It is not a full pattern just a guide for certain people who just couldn't wait! Then again, most of you are savy knitters who will be able to look over the pattern and go aha! and just start knitting.

This hat and the sun hat or brimmed hat which will also be published are based on the pin wheel jumpers or rugs, this works on the same principal.

Many years ago I came across a hat that my Nanna made for me and I remember the old, crinkled pattern book she worked from. It not only had the sun hat, but a beanie and a tam (beret style) winter hat as well.

I haven't been able to find this pattern book anywhere, but I have managed to pull together spiral sun hats and beanies which I'll be sharing, cause really these have been around for decades.

Each pattern is based on the eight-point spiral pattern, but you could do any number spiral pattern. The rainbow one pictured is done with DK Wendy Wash & Wear machine washable 100% merino which is usually 22 stitches. I did this one with 3.75mm dpns and got a tension of 6 stitches per inch.

Below is the rough recipe for a worsted hat. Proper patterns for all sizes and weights to come. I promise ;)

Baby (newborn to 3 to 6months depending on child's head) spiral beanie


Worsted weight, roughly 18 stitches and DPNs or circular needle to make gauge.


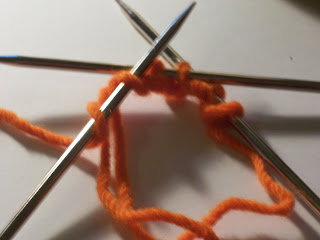
Cast on 8 stitches, using the Loop method (pictured below the pattern)

Row 1: Kfb in each stitch (16)
Row 2: and all even number rounds Knit.
Row 3: K2 yo, repeat to end of round. (24)
Row 5: K3 yo, repeat to end of round. (32)
R7: K4 yo, repeat to end of round. (40)
R9: K5 yo, repeat to end of round. (48)
Continue as set increasing one stitch until
K7 yo (64) and following knit row done.

Now, instead of increasing outwards, you just need to go downwards, but at the same time keep the spiral pattern so:
Row 1: yo * k2tg k6 YO* k2tg k6
Row 2: and all even rows knit except for when the pattern mutates and you end up having to do a YO as the last stitch to balance. Full details in proper pattern to come.
Row 3 k1 Yo * k2tg k6 yo* k2tg k5
Row 5: k2 yo *k2tg k6 yo* k2tg k4
Row 7: k3 yo *k2tg k6 yo* k2tg k3

Continue as set, increasing the number of knit stitches at the begining, until you catch up again (that's the pattern mutate of earlier) and just start repeating.

For a baby continue down for about 10cm, then do rib for several rows, cast off loosely.

LOOP method.

Make a large loop, overlaping once. Then with a needle, carefully dig out a stitch form the working yarn, then dive under the other way, catching the working yarn.
Work until the needle has the right number of 'stitches' on it. Often it works out that the last stitch is more like a yarn over but don't fear it will work.


Carefully pull the end of the cast on tail until you can see the loop tightening up. Carefully transfer stitches so the stitches are spread over three needles if using DPNS or are halved with half on one needle and the rest on the other needle if doing magic loop. After a row or two, pull the cast on end tightly again. There should be no hole there at all.



top down hats


Top down UMBILICAL cord hat.

Tension: 16 sts to 10cm.

The hats pictured were made holding one DK (8ply) yarn with a rainbow variegated mohair yarn (approx DK or worsted weight).

DPNS or Circs: 5.5mm

kfb: Knit front and back into one stitch to increase, or use your preferred increase.

Umbilical cord:

Cast on 4 stitches (with both yarns held together)
Do an Icord for up to 10cm.

K1, KFB, K1, KFB (6)
K1, KFB, K1, K1, KFB, K1 (8)

Carefully put these 8 stitches on three DPNS. You will now start working in the round.

kfb into each stitch (16)
Knit 2 rows
Kfb into each stitch (32)
Knit 2 rows
*K1, kfb* (48)

BABY SIZE This would be a decent circumference for a baby so you can continue on these stitches until length from where you started working in the round is 8cm. Do a 2x2 rib for several rows and cast off loosely.

TODDLER-CHILD CONTINUED

Knit 2 rows
*K2, kFB* (64)
Knit straight until 12cm then rib.
Weave in ends.

If you are going to attach a bell to the top of the umbilical cord make sure that it is sewn on properly using the cast on tail.


For a non umbilical cord hat.
Cast on 8 stitches, move onto three DPNs and follow the pattern from that stitch count.


Tuesday, December 30, 2008

newborn dead fish hat


Newborn pattern based on the Knitty pattern.
Tension 18 sts. row tension not an issue.

In RED cast on 60 stitches, join. Place marker after 30 stitches to denote top and bottom.
Knit four rows and then change to C1(blue) do one row then do the W+T rows. Pick up the wraps, the original pattern says you don’t have to, but it does look dicky if you don’t.

Row 1: Knit 18, w+t
Row 2: purl 6, w+t
Row 3: knit 7, w+t
Row 4: purl 8, w+t
Row 5: knit 9, w+t
Row 6: purl 10, w+t
Row 7: knit 12, w+t
Row 8: purl 14, w+t
Row 9: knit 16, w+t
Row 10: purl 18, w+t
Row 11: knit 20, w+t
Row 12: purl 22, w+t.
Knit 44 stitches, w+t, then repeat from Row 2 to Row 12.

Knit in stocking stitch for about 2.5 inches. (here I went around to the middle of the bottom and changed from CC1 to Red again)
Do 1 row Red and then

Dec Row 1: k8, k2tg (54 sts remain)

Now knit 1.5 inches.

Dec Row 2: k7, k2tg (48 sts)

change to CC2 in the middle of the bottom section (purple).

Now knit 2.5 inches. (a few rows were in the purple and then I changed back to MC red)

Dec Row 3: k6, k2tg (42)

knit 1.25 inches

Dec Row 4: k5, k2tg (36)

Knit .5 inch

Dec Row 5: k4, k2tg (30)

knit 1.25 inches

Dec Row 6: K1, k2tg seven times, k1, k2tg seven times.

TAIL: K 12, put last 8 knitted stitches on a holder, work on the other eight stitches forward for the first fin WHICH WILL BE KNITTED IN THE ROUND. The beginning of the round in in the V between the fins.

Row 1: *K1, Kfb* (12)
Row 2: knit
Row 3: *k1, kfb* (18)
Row 4: knit
Row 5: k3, kfb, k4, kfb twice, k3, kfb. (22)
Row 6: knit
Row 7: knit
Row 8: knit
Row 9: K1, ktg, knit until last three stitches, ssk, k1
Repeat Row 9 until there are 4 stitches left.

Row 18, k2g, ssk.
Break wool and pull through the remaining two stitches.

Return to the held eight stitches, do the remaining tail fin the same. The decreases should be on the V side which is the beginning of the row as seen in the pic below.


Dorsal.

In the middle of the head, mark 3.5 inches back and pick up 10 stitches along the column.
Row 1: kfb to the end of the row (20)
Row 2 to 6: K1, P1
Cast off.

Pectoral fins.

These are place on the side and the front of these fins lines up with the start of the dorsal.

Pic up five stitches in a column.
Row 1: kfb to the end of the row (10)
Row 2 to 6: K1, P1.
Cast off.

Eyes, do some little crochet eyes. Sew on. Please don’t use buttons on anything that baby could end up chewing off.
Sizes 6 to 12months and toddler to come.

Tuesday, August 28, 2007

bliss socks


Bliss socks are made using Debbie Bliss Cashmerino and 2.75mm needles.
The stitch pattern is from one of the tragic 60s or 70s pattern books I have floating around and no doubt there are probably plenty of socks out there with this pattern.

This isn't a pattern as such as it requires basic knowledge of what and where you do things with socks.
As for the finished socks, they can survive the machine and drier, although I've noticed a bit of pilling but I do wear them in floppy birks so they rub around a lot.

My feet are nice little chubby 9inch circ and 9inch long and these are fairly snug, as you can see by the purls pulling out.
I'll edit to add an unstretched circ after I've washed them again.

1: P1, k7, p1
2: p1, k1, k2tg, yo, k1, yo, ssk, k1 p1
3: p1, k7, p1
4: p1, k2tg, yo, k3, yo, ssk, p

Cast
on 54 stitches, join, and do some ribbing (i did about 2.5cm) then do
10 pattern repeats, finishing with a row 4 and divide for the heel.

27 stitches will be held for the instep to keep the pattern going along the foot.

For the heel purl back along 27, decreasing one stitch so that you have 26 stitches for the heel.
Do a trench heel.
Work heel for about 5 or 5.5cm, which ever you need then turn:

sl1, k14, ssk, k1
sl1, p5, p2tg, p1

continue, working the decreases across the gap until 16 heel stitches are left.

Pick up 15 on each side of the heel flap, working the instep stitches in pattern (this should be a row 1).

Decrease
at the instep on every second row, which works out to be a patterned
row, until there are 13 stitches left on each side or 26 in total on
the heel with 27 on the foot.
Continue until foot measures 2.5cm
less than needed then ignore the pattern rows and do straight stocking
stitch, decreasing on every second row.
Continue until 8 stitches left then graft.
Put them on and dance and sing.